Welcome friends to this new blog post where I will teach you how to use CRUD functions using Prisma(ORM tool) with the help of Nextjs (API folder).
First, you have to setup Prisma in your Nextjs app 👇 Get Started with Prisma and Nextjs with Supabase (Postgress Database)
So, let’s begin

First, you need to install 2 packages
yarn add react-hot-toast swr
😁Create Schema
generator client {
  provider = "prisma-client-js"
}

datasource db {
  provider = "postgresql"
  url      = env("DATABASE_URL")
}

model profiles {
  id        String   @id @default(cuid())
  name      String
  email     String
  createdAt DateTime @default(now())
}
Then write this command
prisma migrate dev
If you don’t have any GUI tool for managing your data in the database. Then you can write this command
prisma studio
That will open up a website at localhost:5555, by which you can manage your data quickly.
✍️Create Function
First, you need to create a form.
import type { NextPage } from "next";
import Head from "next/head";
import Image from "next/image";
import React from "react";
import useSwr from "swr";
import toast from "react-hot-toast";

const Home: NextPage = () => {


   const handleSubmit = async (e: React.FormEvent<HTMLFormElement>) => {
    e.preventDefault();

    const formData = new FormData(e.currentTarget);

    const name = formData.get("name");
    const email = formData.get("email");

    const data = await fetch("/api/profiles", {
      method: "POST",
      headers: {
        "Content-Type": "application/json",
      },
      body: JSON.stringify({ name, email }),
    });

    toast.success("Posted");
  };


  return (
    <div className="flex min-h-screen flex-col items-center justify-center py-2">

      {/* We will make a handleSubmit function */}
      <form onSubmit={handleSubmit}>
        <input
          type="email"
          name="email"
          placeholder="Please enter your email"
        />
        <input type="text" name="name" placeholder="Please enter your name" />
        <button type="submit">Submit</button>
      </form>
    </div>
  );
};

export default Home;
Then you need to make an API ENDPOINT in your app.
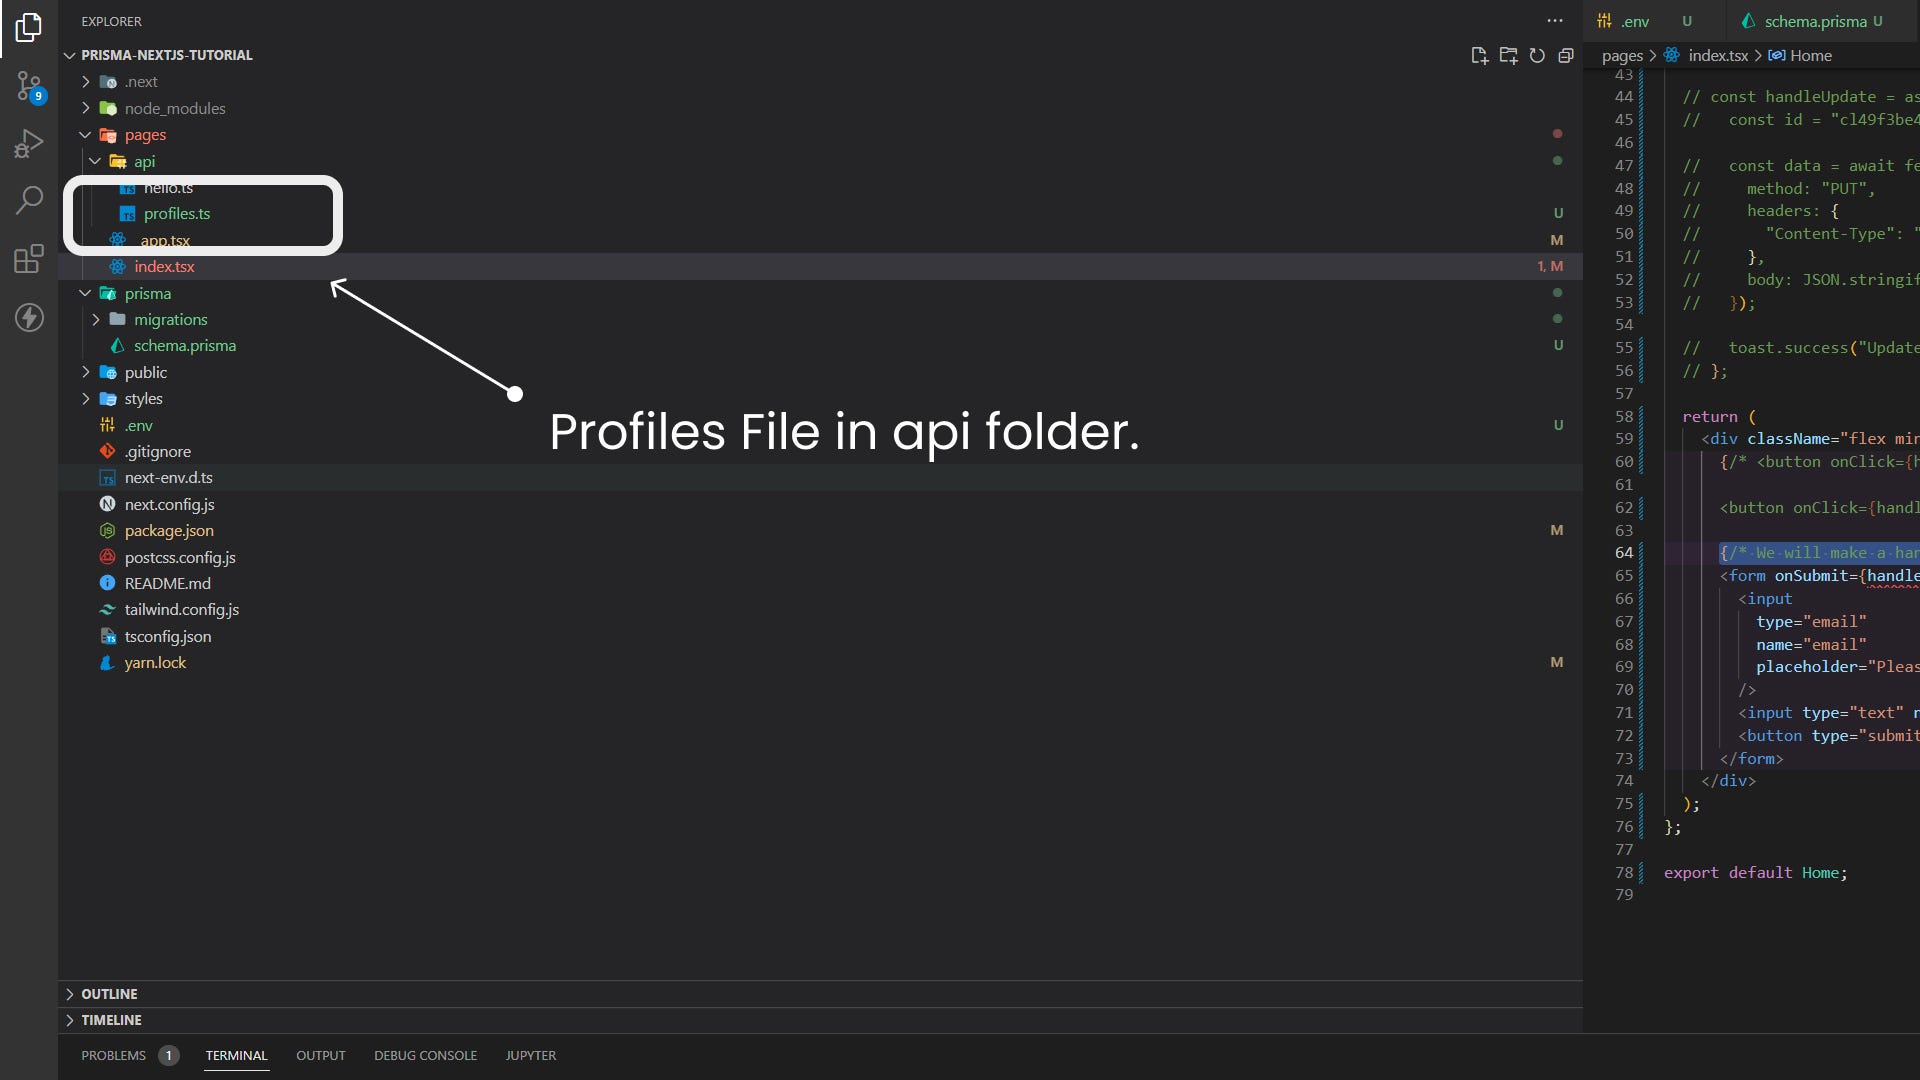
To create that, make a file named — profiles.ts in your API folder in the pages folder.

Then write this code 👇
// Next.js API route support: https://nextjs.org/docs/api-routes/introduction
import type { NextApiRequest, NextApiResponse } from "next";
import { PrismaClient } from "@prisma/client";

const prisma = new PrismaClient();

export default async function handler(
  req: NextApiRequest,
  res: NextApiResponse<any>
) {

  if (req.method === "POST") {
    const { name, email } = req.body;

    const profile = await prisma.profiles.create({
      data: {
        name: name,
        // @ts-ignore
        email: email,
      },
    });

    res.status(201).json({ profile });
  }

  res.status(200).json({ name: "John Doe" });
}
**//@ts-ignore in 18th** line helps to ignore the type error.
Now you can try the create command.
📖Read Function
import type { NextPage } from "next";
import React from "react";
import useSwr from "swr"; // this is the hook
import toast from "react-hot-toast";

const Home: NextPage = () => {

  const fetcher = (url: string) => fetch(url).then((r) => r.json());

  const { data, error } = useSwr("/api/profiles", fetcher);

  console.log(data);


    // handles the command to create a entry in the database
  const handleSubmit = async (e: React.FormEvent<HTMLFormElement>) => {
    e.preventDefault();

    const formData = new FormData(e.currentTarget);

    const name = formData.get("name");
    const email = formData.get("email");

    const data = await fetch("/api/profiles", {
      method: "POST",
      headers: {
        "Content-Type": "application/json",
      },
      body: JSON.stringify({ name, email }),
    });

    toast.success("Posted");
  };


  return (
    <div className="flex min-h-screen flex-col items-center justify-center py-2">

      {/* We will make a handleSubmit function */}
      <form onSubmit={handleSubmit}>
        <input
          type="email"
          name="email"
          placeholder="Please enter your email"
        />
        <input type="text" name="name" placeholder="Please enter your name" />
        <button type="submit">Submit</button>
      </form>
    </div>
  );
};

export default Home;
Then go to your profiles.ts in API folder.
// Next.js API route support: https://nextjs.org/docs/api-routes/introduction
import type { NextApiRequest, NextApiResponse } from "next";
import { PrismaClient } from "@prisma/client";

const prisma = new PrismaClient();

export default async function handler(
  req: NextApiRequest,
  res: NextApiResponse<any>
) {
  if (req.method === "GET") {
    const profiles = await prisma.profiles.findMany();

    res.status(200).json(profiles);
  }

  if (req.method === "POST") {
    const { name, email } = req.body;

    const profile = await prisma.profiles.create({
      data: {
        name: name,
        // @ts-ignore
        email: email,
      },
    });

    res.status(201).json({ profile });
  }

  res.status(200).json({ name: "John Doe" });
}
Now you can get the data that you created:
📝Update Function
import type { NextPage } from "next";
import Head from "next/head";
import Image from "next/image";
import React from "react";
import useSwr from "swr";
import toast from "react-hot-toast";

const Home: NextPage = () => {
  const fetcher = (url: string) => fetch(url).then((r) => r.json());

  const { data, error } = useSwr("/api/profiles", fetcher);

  console.log(data);

  const handleSubmit = async (e: React.FormEvent<HTMLFormElement>) => {
    e.preventDefault();

    const formData = new FormData(e.currentTarget);

    const name = formData.get("name");
    const email = formData.get("email");

    const data = await fetch("/api/profiles", {
      method: "POST",
      headers: {
        "Content-Type": "application/json",
      },
      body: JSON.stringify({ name, email }),
    });

    toast.success("Posted");
  };

  //   this command will update the entry in our database
  const handleUpdate = async () => {
    const id = [YOUR - ENTRY - ID - HERE]; // you can get it in prisma studio

    const data = await fetch(`/api/profiles?id=${id}`, {
      method: "PUT",
      headers: {
        "Content-Type": "application/json",
      },
      body: JSON.stringify({ name: "Taranpreet Singh" }),
    });

    toast.success("Updated");
  };

  return (
    <div className="flex min-h-screen flex-col items-center justify-center py-2">
      <button onClick={handleUpdate}>Update</button>

      {/* We will make a handleSubmit function */}
      <form onSubmit={handleSubmit}>
        <input
          type="email"
          name="email"
          placeholder="Please enter your email"
        />
        <input type="text" name="name" placeholder="Please enter your name" />
        <button type="submit">Submit</button>
      </form>
    </div>
  );
};

export default Home;
Then go to your profiles.ts in api folder.
// Next.js API route support: https://nextjs.org/docs/api-routes/introduction
import type { NextApiRequest, NextApiResponse } from "next";
import { PrismaClient } from "@prisma/client";

const prisma = new PrismaClient();

export default async function handler(
  req: NextApiRequest,
  res: NextApiResponse<any>
) {
  if (req.method === "GET") {
    const profiles = await prisma.profiles.findMany();

    res.status(200).json(profiles);
  }

  if (req.method === "POST") {
    const { name, email } = req.body;

    const profile = await prisma.profiles.create({
      data: {
        name: name,
        // @ts-ignore
        email: email,
      },
    });

    res.status(201).json({ profile });
  }

  if (req.method === "PUT") {
    const id = req.query.id;

    const { name } = req.body;

    const profile = await prisma.profiles.update({
      where: {
        // @ts-ignore
        id: id,
      },
      data: {
        name: name,
      },
    });

    res.status(201).json({ message: "Updated" });
  }

  res.status(200).json({ name: "John Doe" });
}
Now, you can see that your entry.name has been changed to ‘Taranpreet Singh’.
⛔Delete function
import type { NextPage } from "next";
import Head from "next/head";
import Image from "next/image";
import React from "react";
import useSwr from "swr";
import toast from "react-hot-toast";

const Home: NextPage = () => {
  const fetcher = (url: string) => fetch(url).then((r) => r.json());

  const { data, error } = useSwr("/api/profiles", fetcher);

  console.log(data);

  const handleSubmit = async (e: React.FormEvent<HTMLFormElement>) => {
    e.preventDefault();

    const formData = new FormData(e.currentTarget);

    const name = formData.get("name");
    const email = formData.get("email");

    const data = await fetch("/api/profiles", {
      method: "POST",
      headers: {
        "Content-Type": "application/json",
      },
      body: JSON.stringify({ name, email }),
    });

    toast.success("Posted");
  };


  const handleUpdate = async () => {
   const id = [YOUR ID HERE];

    const data = await fetch(`/api/profiles?id=${id}`, {
      method: "PUT",
      headers: {
        "Content-Type": "application/json",
      },
      body: JSON.stringify({ name: "Taranpreet Singh" }),
    });

    toast.success("Updated");
  };


//   handles the delete button
  const handleDelete = async () => {
    const id = [YOUR ID HERE];

    const data = await fetch(`/api/profiles?id=${id}`, {
      method: "DELETE",
    });

    toast.success("Deleted");
  };

  return (
    <div className="flex min-h-screen flex-col items-center justify-center py-2">
      <button onClick={handleDelete}>Delete</button>

      <button onClick={handleUpdate}>Update</button>

      {/* We will make a handleSubmit function */}
      <form onSubmit={handleSubmit}>
        <input
          type="email"
          name="email"
          placeholder="Please enter your email"
        />
        <input type="text" name="name" placeholder="Please enter your name" />
        <button type="submit">Submit</button>
      </form>
    </div>
  );
};

export default Home;
Now you can go to api.tsx in your api folder.
// Next.js API route support: https://nextjs.org/docs/api-routes/introduction
import type { NextApiRequest, NextApiResponse } from "next";
import { PrismaClient } from "@prisma/client";

const prisma = new PrismaClient();

export default async function handler(
  req: NextApiRequest,
  res: NextApiResponse<any>
) {
  if (req.method === "GET") {
    const profiles = await prisma.profiles.findMany();

    res.status(200).json(profiles);
  }

  if (req.method === "POST") {
    const { name, email } = req.body;

    const profile = await prisma.profiles.create({
      data: {
        name: name,
        // @ts-ignore
        email: email,
      },
    });

    res.status(201).json({ profile });
  }

  if (req.method === "PUT") {
    const id = req.query.id;

    const { name } = req.body;

    const profile = await prisma.profiles.update({
      where: {
        // @ts-ignore
        id: id,
      },
      data: {
        name: name,
      },
    });

    res.status(201).json({ message: "Updated" });
  }

  if (req.method === "DELETE") {
    const id = req.query.id;

    const profile = await prisma.profiles.delete({
      where: {
        // @ts-ignore
        id: id,
      },
    });

    res.status(200).json({ profile });
  }

  res.status(200).json({ name: "John Doe" });
}
Now you can test the button.
If you encounter any error, then observe your console logs.
😃Thanks for reading.
If you understand Hindi, You can watch it for the tutorial 👇 https://youtu.be/NiCQ4KIi6VU
You can join my discord channel here 👇 Join the Next Dev's server Discord Server!
